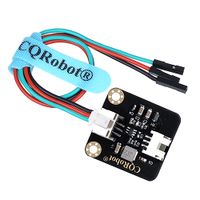
Contact Multi-point Photoelectric Liquid Level Sensor SKU: CQRSENYW003
Contents
Description
Contact Multi-point Liquid Level Sensor, This is a photoelectric water liquid level sensor that is operates using optical principles. Open collector output mode, suitable for connecting various circuits and product applications.
The sensor has no mechanical parts, requires no additional adjustment, and has high sensitivity, low power consumption, corrosion resistance, high pressure resistance, high temperature resistance and chemical stability.
This sensor probe is small in size and has a structure that can be placed up, down, laterally, and diagonally in multiple orientations to detect solution spillage, dryness and horizontal level. Can be used as a reminder and alarm function.
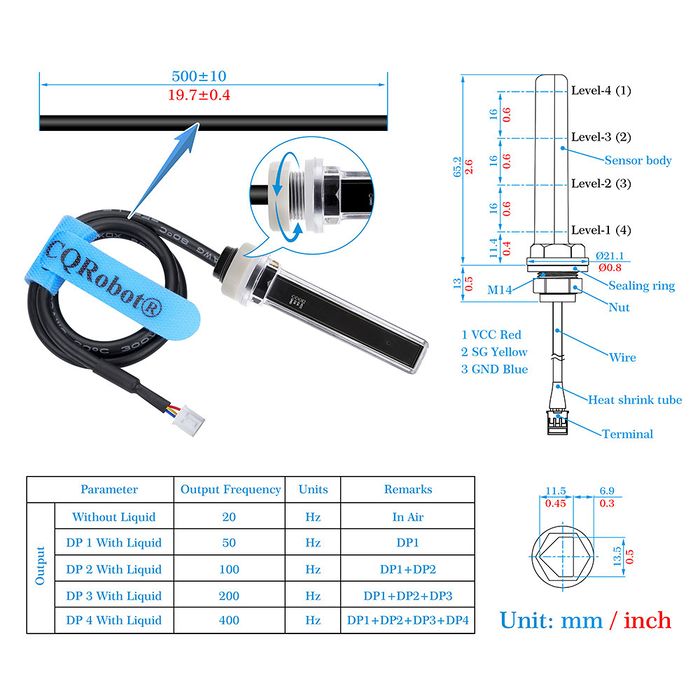
The multi-point liquid level sensor can detect 4 liquid levels with a detection accuracy of up to ±1 mm, high reliability and ultra-low standby power consumption.
Compatible with Arduino motherboard and Raspberry Pi motherboard. for Automatic Irrigation Systems, Aquariums, Plants, in The Garden, in Agriculture etc.
Note: Avoid placing the sensor near bright lights or in direct sunlight as these can cause interference.
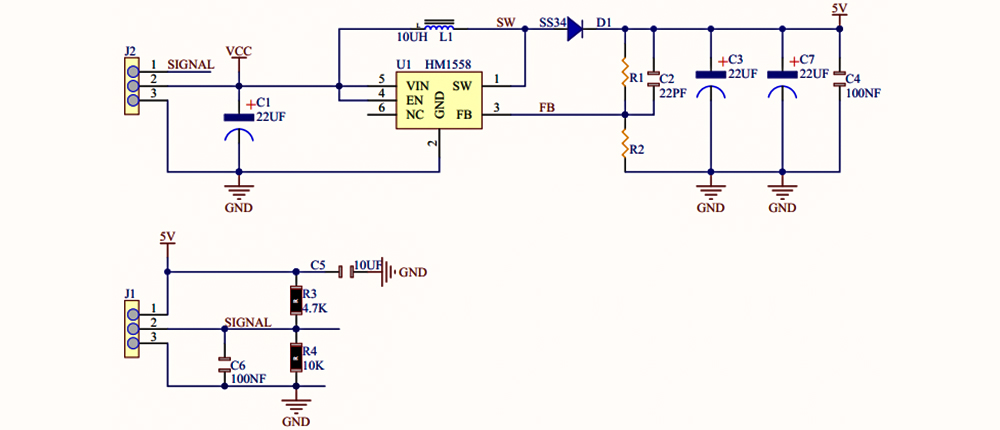
Product Principle Diagram
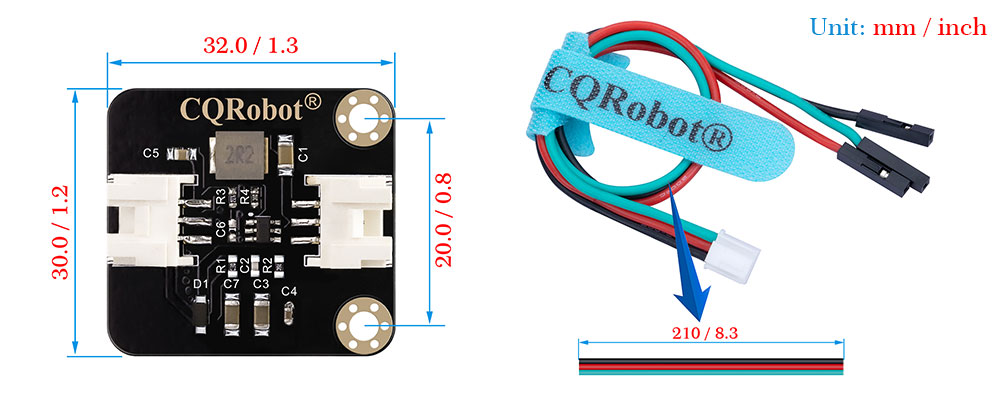
Size Display
Specifications
Contact Multi-point Photoelectric Liquid Level Sensor
- Model: CQRSENYW003;
- Working Voltage: 3.3V / 5V;
- Working Current: 3.3V / minimum 80mA;
- Working Current: 5V / minimum 55mA;
- Output Frequency Without Liquid: 20Hz;
- Output Frequency Detection Point 1 With Liquid: 50Hz;
- Output Frequency Detection Point 2 With Liquid: 100Hz;
- Output Frequency Detection Point 3 With Liquid: 200Hz;
- Output Frequency Detection Point 4 With Liquid: 400Hz;
- Working Temperature: -10 Degree Celsius to +60 Degree Celsius;
- Dimensions: 32 mm * 30 mm;
- Mounting Hole Size: 3.0 mm;
Cable Specifications
- Cable Specifications: 22AWG;
- Material: Silicone;
- Withstand Voltage: Less Than 50V;
- Withstand Current: Less Than 1000MA;
- Length: 21cm;
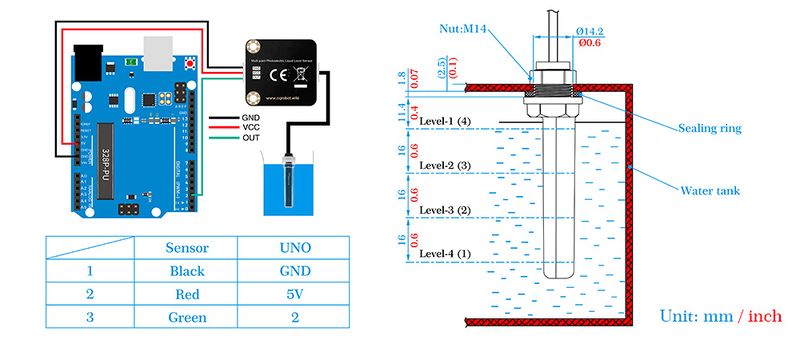
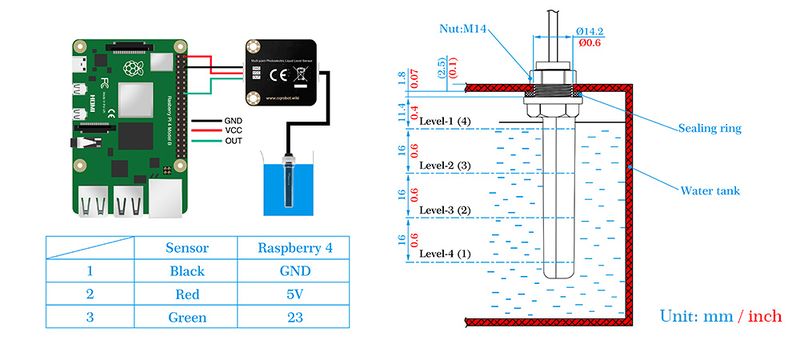
- Line Sequence: Black-Negative Power Supply, Red-Positive Power Supply, Green-Output Frequency.
Arduino Example and Test Code
1. Arduino Connection Method
2. Sample Code
2.1 Software download link: https://www.arduino.cc/en/software
2.2 Download and Run the Test Examples
Media: CQRSENYW003-Arduino.rar
long time1, time2, time3;
float Frequency;

void setup()
{
  Serial.begin(9600);                  //Initialize the serial port
  pinMode(2, INPUT_PULLUP);            //Set D2 to pull up
  attachInterrupt(0, Blink, FALLING);  //Set interrupt 0 (UNO digital D2)
}

void loop()
{
  //Print frequency value through serial port
  Serial.print("Frequency=");
  Serial.println(Frequency + String(" HZ"));
  delay(100);
}

//Interrupt function
void Blink()
{
  time1 = time2;
  time2 = micros();
  time3 = time2 - time1;
  Frequency = 1000000.0 / time3;
}
3. Example
Upload the program to the Arduino UNO board and connect the wires correctly. Open the serial port and set the baud rate to 9600. When the sensor is not in contact with liquid, the serial port prints Frequency = 20 HZ; when the water level is at Level-4 (1) in the figure below, the serial port prints Frequency = 50 HZ; when the water level is at Level-3 (2) in the figure below, the serial port prints Frequency = 100 HZ; when the water level is at Level-2 (3) in the figure below, the serial port prints Frequency = 200 HZ; when the water level is at Level-1 (4) in the figure below, the serial port prints Frequency = 400 HZ.
Raspberry Pi Example and Test Code
1. Raspberry Pi Connection Method
2. Sample Code
2.1 Software download link:
First, go to the Raspberry Pi official website to download the system: You must select the download box in the figure below, otherwise the sensor will not work properly.
https://www.raspberrypi.com/software/operating-systems/#raspberry-pi-os-legacy-64-bit
2.2 Download and Run the Test Examples
Media: CQRSENYW003-Raspberry Pi.rar
import RPi.GPIO as GPIO
from time import time, sleep

GPIO.setmode(GPIO.BCM)
GPIO.setwarnings(False)

GPIO_IN = 23
GPIO.setup(GPIO_IN, GPIO.IN, pull_up_down=GPIO.PUD_UP)

pulse_count = 0
last_time = 0
total_time = 0
last_time = time()

def handle_counter(channel):
    global pulse_count, last_time, total_time
    pulse_count += 1
    total_time = total_time + (time() - last_time)
    last_time = time()

GPIO.add_event_detect(GPIO_IN, GPIO.RISING, callback=handle_counter)

try:
    print("Press Ctrl+C to end")
    while True:
        sleep(1)
        f = pulse_count/total_time
        print("Pulse frequency: %d" %(f))
        pulse_count = 0
        total_time = 0
except KeyboardInterrupt:
    pass

GPIO.cleanup()
